Make Overwrite Prompt Appear Again in Winscp
If you're on Windows and demand to deeply transfer files to and from an SSH host, the Windows tool, WinSCP, may be a keen choice. WinSCP is a Windows open-source tool that allows you lot to manage files and directories on remote hosts via SFTP, FTP, AWS S3, and SCP.
If WinSCP sounds like an interesting tool, look no further than this ATA Ultimate Guide! In this guide, yous will learn how to set WinSCP and larn all the ways WinSCP helps you transfer files to/from remote hosts.
Let's get going!
Prerequisites
If you'd like to follow along, side by side, with the demos in this guide, be sure yous accept the following:
- A Windows XP+ PC – This tutorial will utilize Windows ten Enterprise.
- A remote SSH host – This tutorial will apply an Ubuntu 18.04.v LTS auto.
- Putty – If you lot'd like to learn how to open WinSCP sessions in Putty.
Installing WinSCP
Earlier you can begin wielding files and directories like a pro with WinSCP, you must first download and install it. Let'due south get that done.
Open your favorite web browser, navigate to the WinSCP official download folio and download the latest version of WinSCP. This tutorial will be using v5.17.ten.
The default WinSCP package will exist in English but you tin also download other translation packages.
Once downloaded, run the installer and pace through the prompts accepting all of the defaults. On the Initial User Settings screen, the tutorial volition be using the Commander style of interface. This interface has more features than the trimmed downwards Explorer interface.
Choosing an Interface
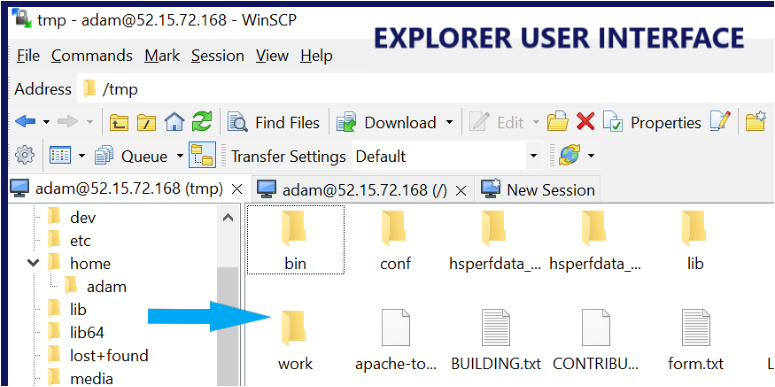
WinSCP has ii user interfaces chosen Commander and Explorer. These interfaces allow you to piece of work with WinSCP via the typical WinSCP (Commander mode) or brand WinSCP resemble Windows File Explorer.
The biggest divergence in the two interfaces is how WinSCP displays file structures. You tin can run into the differences below.

Y'all can modify interfaces any fourth dimension you'd similar. To change them:
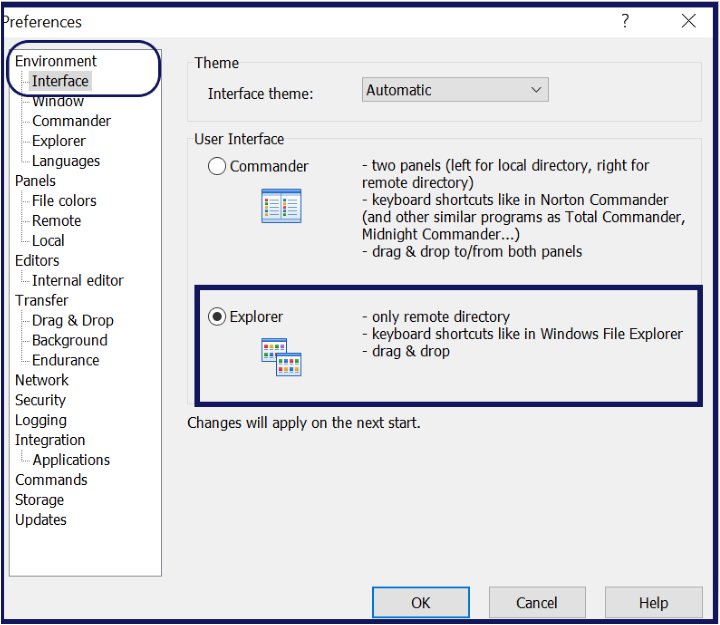
1. In WinSCP, click on the Options menu and select Preferences.

ii. Click on Interface under the Environment category. Here you tin can see where to select either interface. Later on you cull an interface, click OK.
iii. Close WinSCP and open it again. After yous run it again you will notice that WinSCP has changed to the expected interface.
This tutorial volition be using the default Commander interface.
Connecting to a Remote Host
You could piece of work with local directories and files all day in WinSCP merely that's non quite the point. You're using WinSCP to manage remote files! Allow'southward at present dive into how to connect to remote machines!
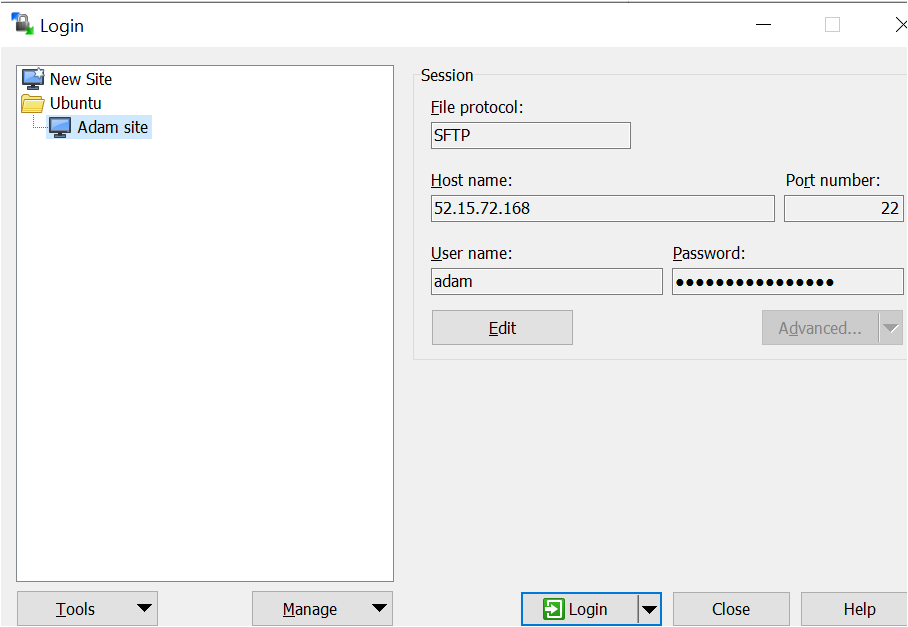
In WinSCP, at that place are various ways to connect (and salvage connections) to remote hosts. To start off, let's first focus on performing a simple, one-off connection. To practise that, click the Session menu. Yous'll see a new Login window appear, as shown below.
This window is where you can quickly connect to remote hosts or save connections to hosts known every bit sites which you'll acquire nigh later.
If you don't have any sites created, the window volition default to the New Site selection in the left-hand window. At this time, yous don't need to worry nearly sites.
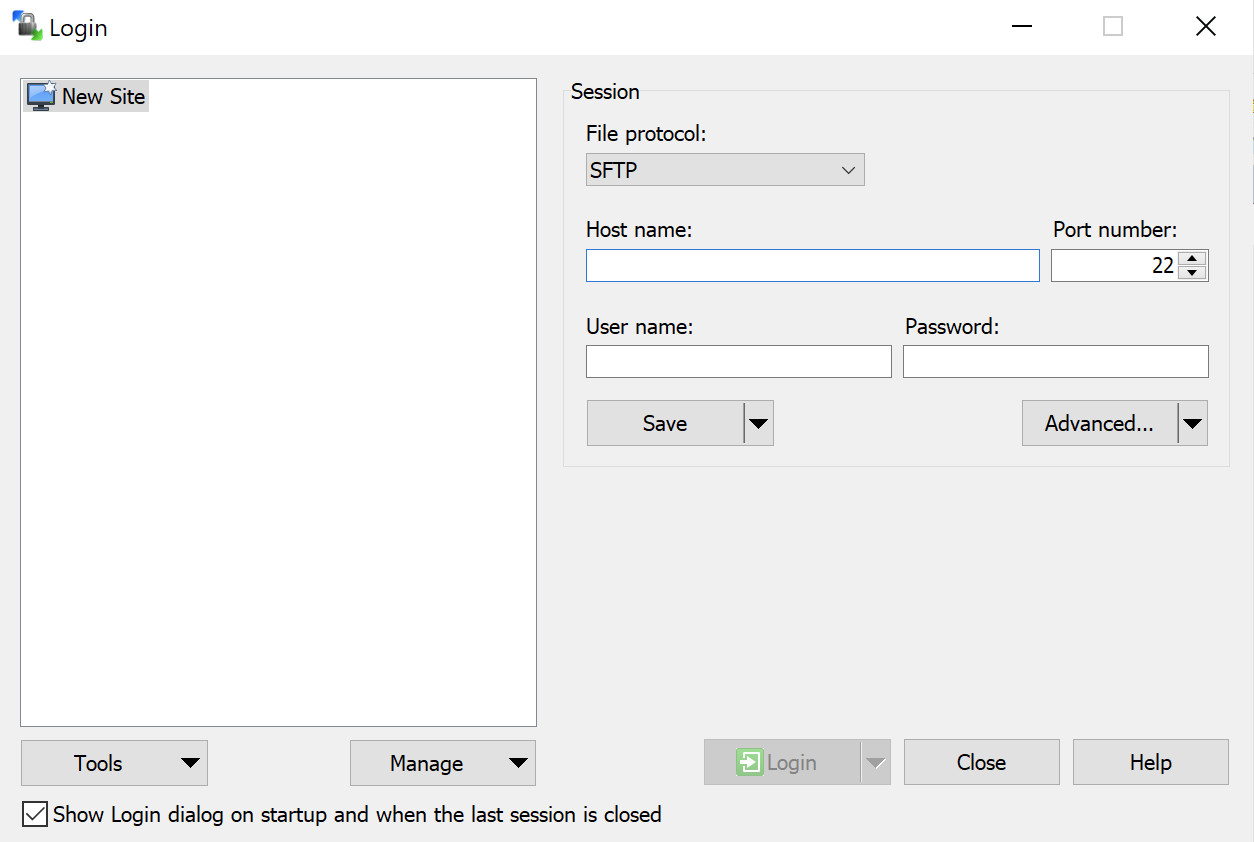
To connect to a remote host, WinSCP requires a few parameters:
- File protocol – The method to connect to the remote host. WinSCP supports five different protocols to connect to remote hosts.
- SFTP or SSH File Transfer Protocol is a network protocol that allows you to transfer files and manage all file activities over a secure network. Information technology is the slowest in general equally it encrypts all the information and waits for packet transfer and confirmations.
- FTP or File Transfer Protocol is a protocol is similar to SFTP, just with this protocol, y'all have an option to either cosign yourself, which is secured with SSL/TLS protocol, or you can connect anonymously if the remote server allows. FTP is faster than the SFTP protocol.
- SCP or Secure Copy Protocol is a protocol that copies the files from 1 car to a remote machine securely over SSH. SCP is supported on Unix-similar platforms just. The speed of copying the files is faster than SFTP.
- WebDAV or Web Distributed Authoring and Versioning is an extension of the Hypertext Transfer Protocol (HTTP) that allows the users to edit and manage documents and files stored on web servers.
- S3 or Amazon Simple Storage Service is a web service provided past Amazon Web Services. It is a storage service that works on diverse protocols such equally Remainder, Soap, and many more, but WinSCP uses Residue to work with the S3 service.
- Host name – The remote host's hostname or IP address.
- Port number – The TCP port number the remote host's File protocol is listening on. Most SSH implementations mind on the default TCP port 22.
- User proper noun – The username to connect to the remote host
- Password – The password for the username to connect with.
When you've completed filling in all of the connection data, click on the Login push to connect to the remote host.
When connected, WinSCP will and then display the remote host's dwelling directory on the right side and evidence the current session's continued username and host, as shown below.
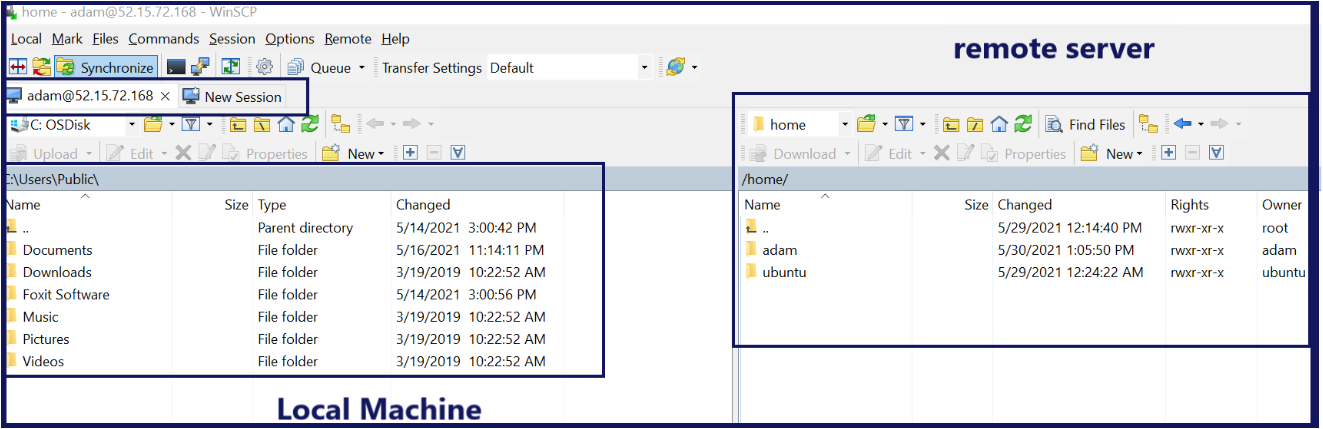
At this point, you tin at present begin navigating directories for both the local and remote sessions and managing files between sessions.
Navigating Directories
When WinSCP creates a remote session with a host, it will drop y'all into the user account you continued with's home directory. Chances are, this directory isn't the directory you'd like to be in. When that happens, y'all must start navigating effectually to find the directory and/or files you'd like to piece of work with.
Opening Parent Directories
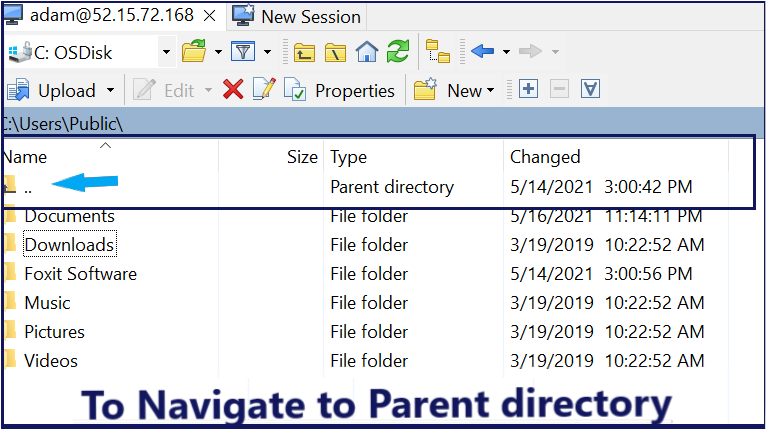
Just like Windows Explorer, WinSCP represents directories as folders in both the local and remote session panes. Y'all tin can click around and drill into directories like you're used to. But, different Windows Explorer, WinSCP doesn't have an up arrow allowing you lot to navigate into parent directories.
A file system stores directories in a hierarchical fashion with parent and kid directories. If yous're in a child directory, double-click on the 2 dots (..), as shown below. Yous'll come across that WinSCP changes the directory to the electric current directory's parent.
Opening Specific Directory Paths
Although you can navigate file systems with WinSCP to observe directories, yous can also open specific directory paths if y'all know them alee of time.
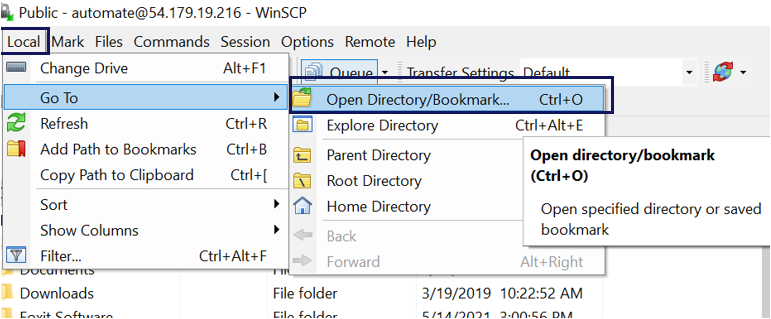
If you know a specific directory path y'all'd similar to open, click on the Local bill of fare —> Become To —> Open Directory/Bookmark, every bit shown beneath. WinSCP will and so open up a window titled Open directory which prompts you with a Browse button allowing you to type in a path or scan to one.

Y'all'll notice a Local and Remote selection in the card bar. These ii options contain like actions. The Local bill of fare performs actions on the local calculator and the Remote carte performs actions on the remote calculator.
Bookmarking Directories
If you lot have certain directories you access ofttimes, WinSCP allows you to bookmark directories. Bookmarking directories create a common list of directories y'all can hands come back to later.
Creating Directory Bookmarks
To bookmark directories in WinSCP:
1. Click on the directory you'd like to bookmark in the directory pane.
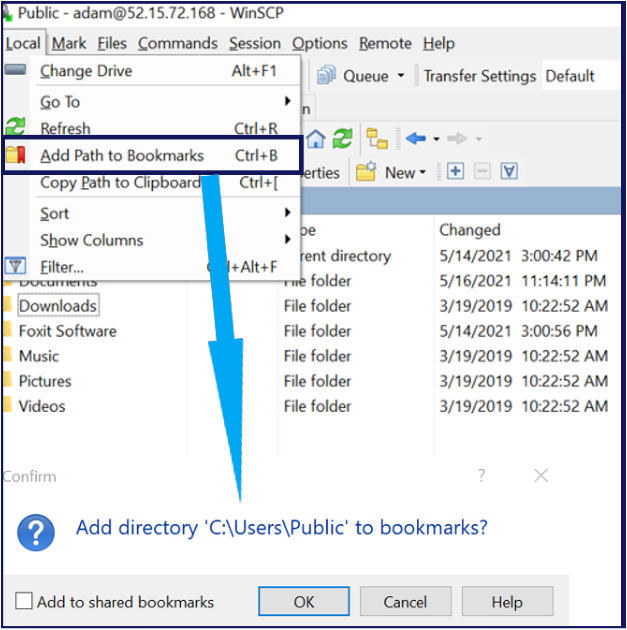
2. Click on the Local menu —> Add Path to Bookmarks. This action will bring up a confirmation box, as you tin run into beneath.
Detect the Add to shared bookmarks checkbox. WinSCP has session and shared bookmarks. Session bookmarks are only applicable to the current session. When you disconnect from the session, your bookmarks disappear. Shared bookmarks, on the other paw, remain saved and you must manually remove them.
3. Click OK to confirm the bookmark.
Opening Bookmarked Directories
One time you lot have one or more bookmarks created, you can then apace navigate to those bookmarked directories. To exercise so:
1. Navigate to the Local menu —> Become To —> Open Directory/Bookmark.
ii. Select the bookmarked directory, as shown below.
In the below screenshot, you'll come across the entry C:\Users\Public show up in the Shared bookmarks tabs. This bookmark exists here considering when saving the bookmark, the Add to Shared bookmarks checkbox was enabled.
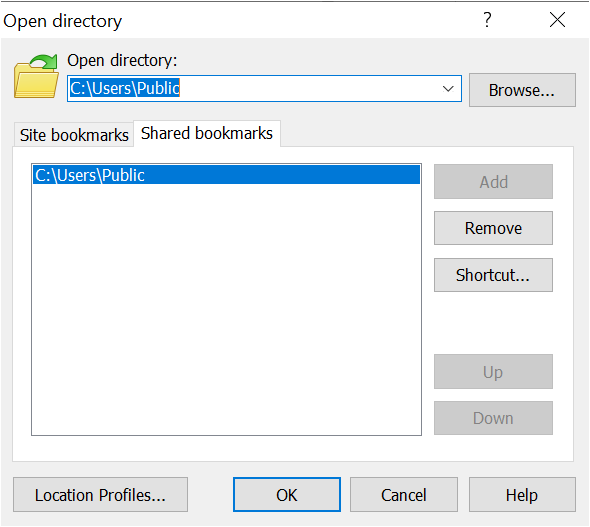
3. Click OK to open the bookmark.
Once you lot click on OK, WinSCP will then have yous straight to the directory.
Navigating Files
You're going to be doing a lot with files in WinSCP so it'south of import you know the ropes! Other than clicking around in the filesystem, WinSCP has a few piffling-known features y'all may not exist aware of.
Finding Files
If y'all'd like to transfer some files to/from a remote session in a directory with hundreds or thousands of files, you don't have to click around until you find them. Instead, you lot can use WinSCP'south filtering capability to narrow down on exactly what you're looking for.
To filter out all of the files yous're not looking for in the file panes:
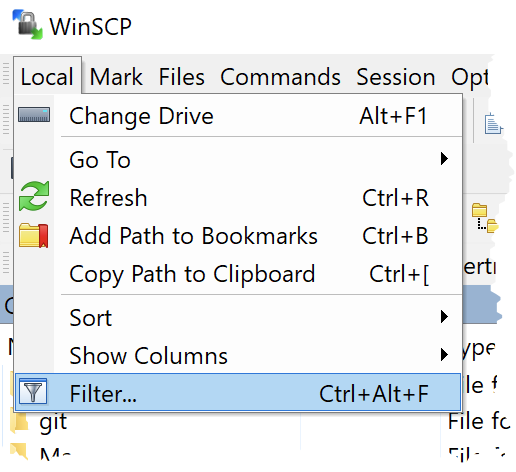
1. Click on the Local (or Remote) menus and click on Filter. This activeness will bring upwards the Filter dialog box where you can provide a File mask.
2. In the File mask box, provide a file mask based on the required syntax.
3. Click on the Edit button and you lot will see a graphical mode to create a file mask filter.
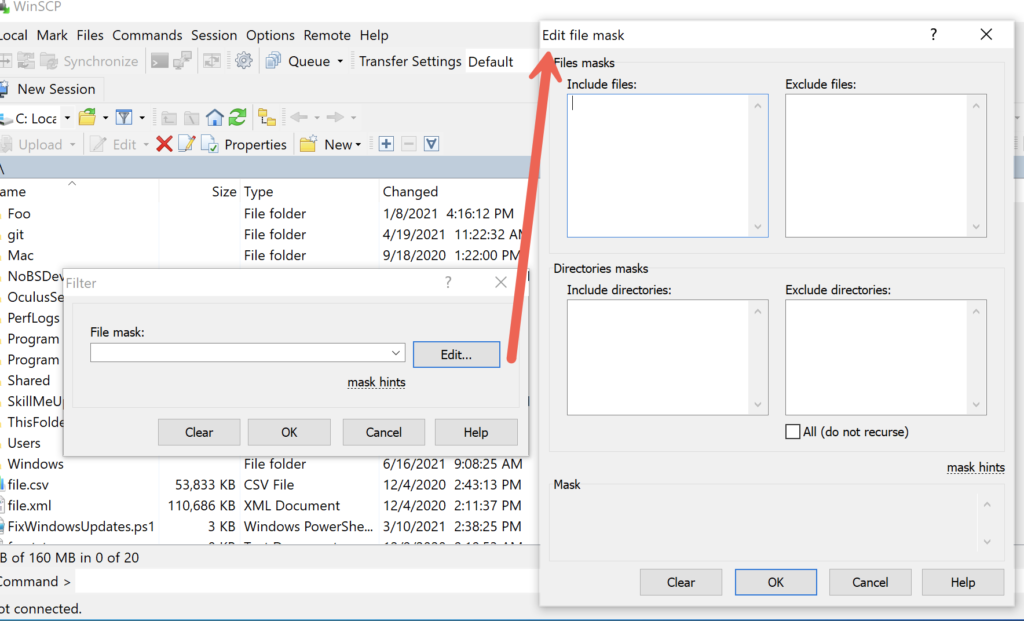
4. Click OK and you'll see the file pane only shows the files that match your file mask.
Sorting Files
In WinSCP, you can sort files in either the local or remote file pane based on various criteria like name, extension, date modified and more than.
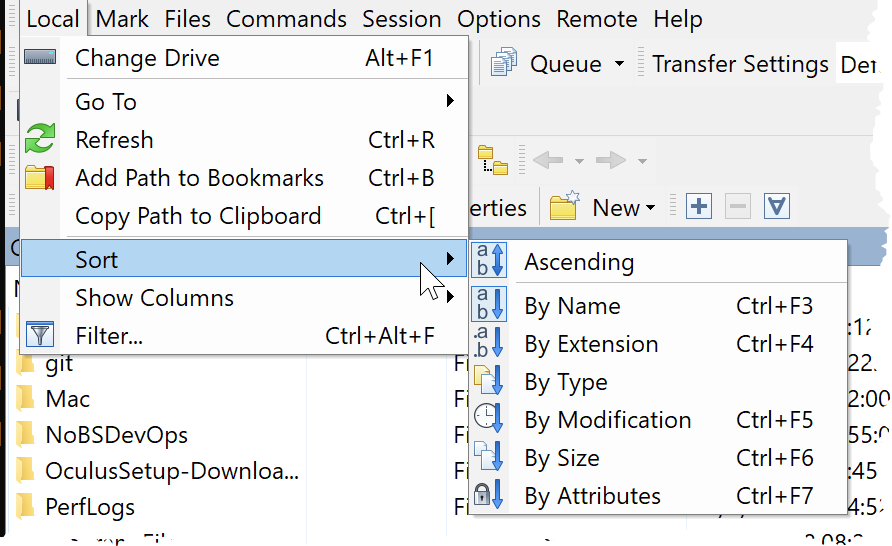
To sort files, click on the Local (or Remote) menu —> Sort and choose the attribute you'd similar to sort files on.
Showing Hidden Files
Are yous not seeing all of the files you know to be on the local or remote computer? They might exist subconscious. To show hidden files in WinSCP:
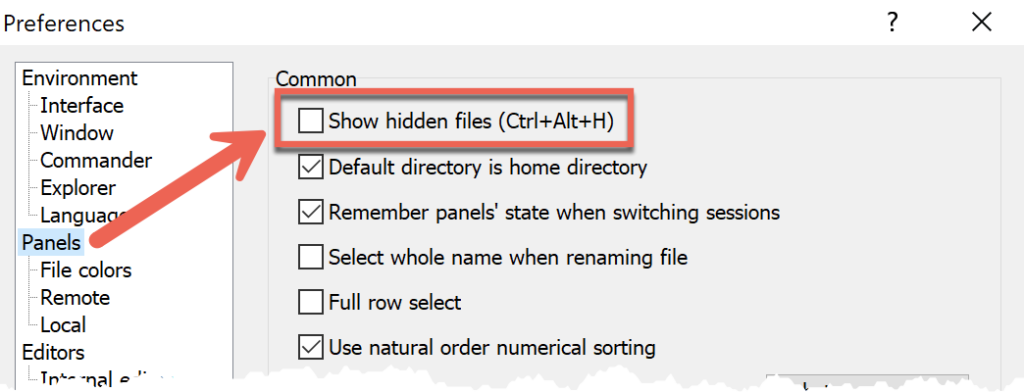
Click on Options —> Preferences. Inside of the Preferences window, click on the Panels section and select Evidence subconscious files (Ctrl-Alt-H).
WinSCP has several keyboard shortcuts to prevent clicking around.
Once you tell WinSCP to show hidden files, information technology will so allow you to manage those files as you'd expect.
Selecting Files
Before you tin transfer files, you must showtime select which ones you'd like to transfer. If you're simply copying a few files, simply navigating to the directories you need, clicking a file, or holding Ctrl or Shift and selecting multiple files volition piece of work.
Sometimes, you'll have many different files matching various criteria to transfer. In that case, take a look at the Marker carte. In WinSCP, "marking" allows you to create filters for files in a specific directory which volition then select them all.
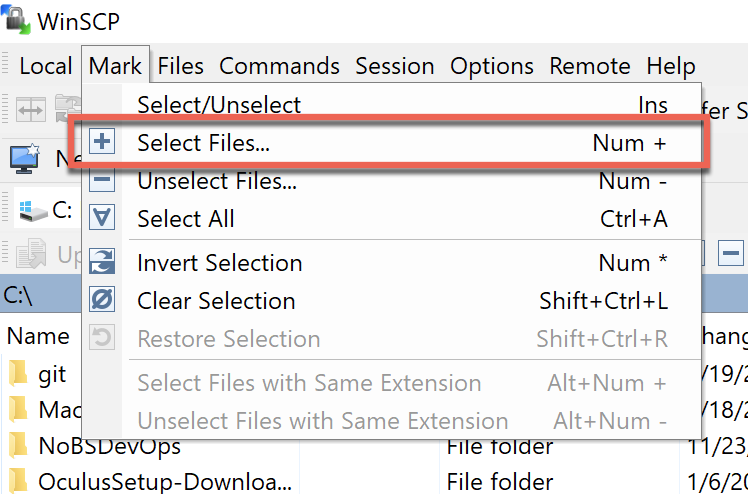
For example, perhaps yous take a large directory of files opened and would similar to simply transfer the files with a file extension of ps1. To do that:
1. Click on the Marking bill of fare and click Select Files…, every bit shown below.
2. Next, specify the file mask you lot'd similar for each file to match.
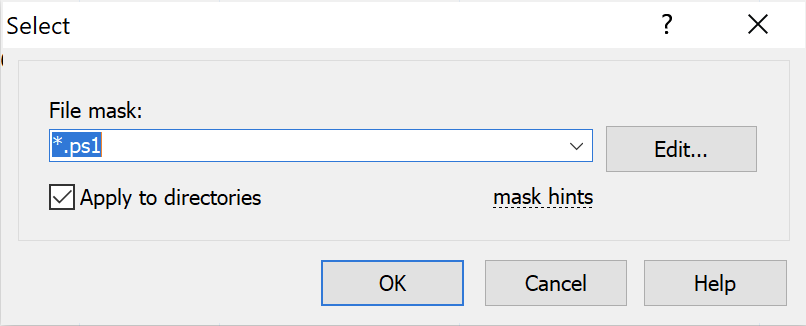
You'll notice the the Select Files and Filter feature both utilize the aforementioned method to specify a file mask.
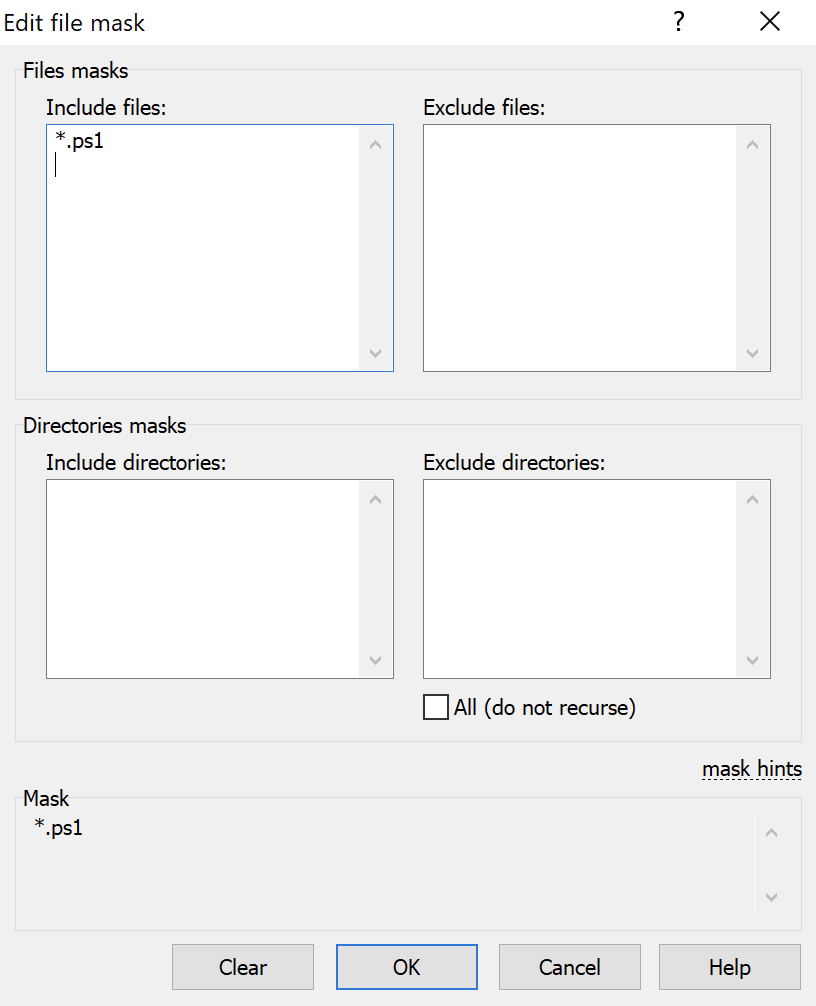
If y'all need to apply more avant-garde filters, you could click on the Edit push button which brings upward other options to apply to your filter.
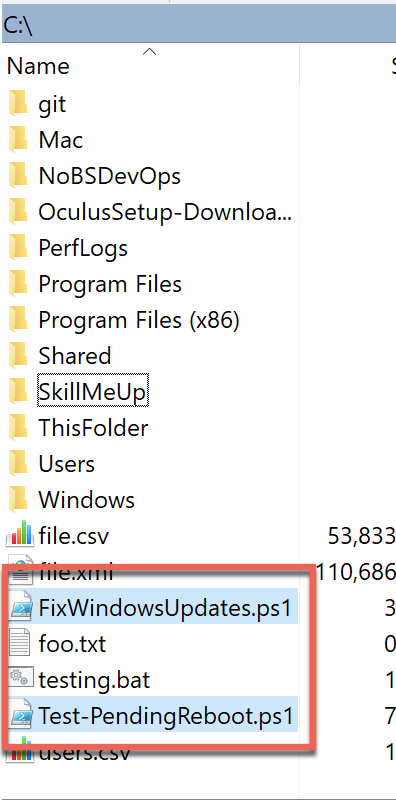
Click OK to confirm the selection filter and you'll run into that the current directory contains all of the subdirectories and filters that match the selection filter are selected.
Transferring Files
So you've at present customized WinSCP to your liking, connected to a remote session, and know how to navigate around the local and remote filesystems. It'south time to start actually doing something with WinSCP; transferring some files!
Within WinSCP, you have many different ways y'all tin can transfer (and fifty-fifty sync) local and remote files. Let'due south now cover each method from easiest to most advanced.
Dragging and Dropping
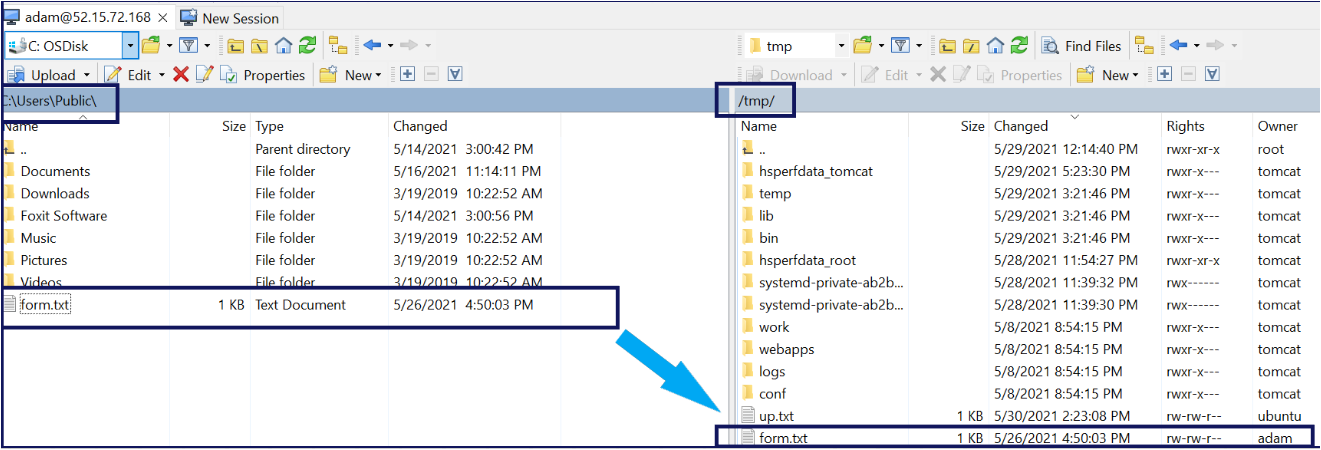
Whenever you're connected to a remote host, i of the easiest means to transfer files is by dragging and dropping one or more files to and from local and remote windows.
To re-create files via drag and drib, get-go, navigate to the local and remote directories you'd like to transfer files to/from and click and elevate 1 or directories or files across.
You lot tin can also use the keyboard to select items with the arrow keys to switch between items, using the spacebar or the Insert central to select them.
Copying and Pasting
If dragging and dropping isn't your matter, you can too re-create and paste files to/from remote hosts. To practice so, select one or more files, right click them and select Copy.
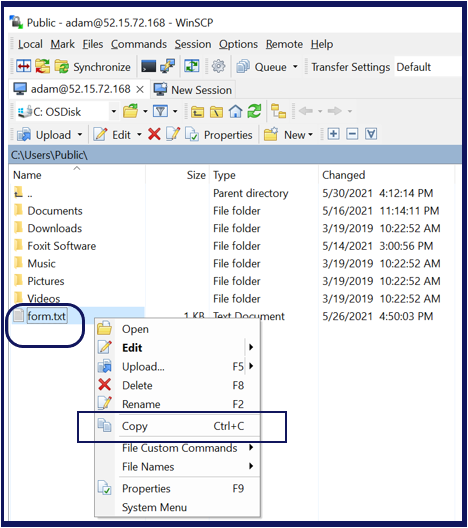
In the other window, navigate to the directory you'd similar to copy the files you've simply selected, right click in the window, and choose Paste.
Invoking an Advanced Transfer
Dragging and dropping or copying and pasting files does transfer files with WinSCP but your options are limited. By default, for example, WinSCP uses the binary transfer mode. Perhaps you'd rather use text mode? Yous tin can prepare many different options to perform a file transfer in WinSCP.
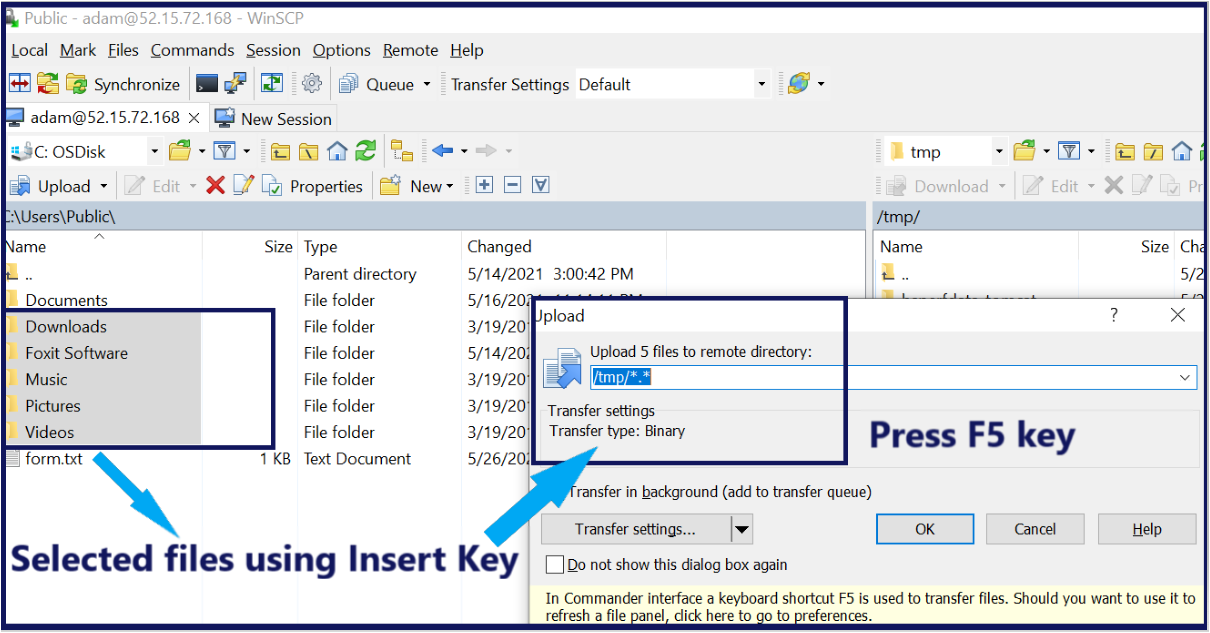
To invoke an advanced transfer, select the files you lot'd like to transfer and hit the F5 key. Hitting this key will bring upward an Upload window to select various transfer options.
At this point, you have a few options. You could either perform a standard transfer past clicking OK or you could alter the file mask hither to merely transfer certain files.
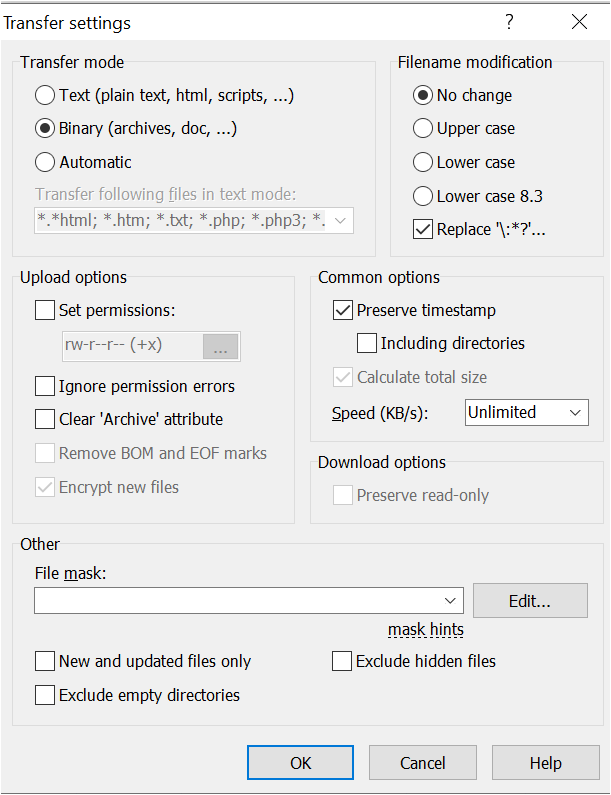
If you'd click on the Transfer Settings button though, y'all'd have a whole lot more than options this tutorial volition not comprehend. In the Transfer Settings window, you can modify the transfer mode, set permissions on files once uploaded, preserve the local timestamp, and more.
Background Transfers and the Transfer Queue
If you're transferring a file here and in that location, typically, you'll exist transferring files via WinSCP in the foreground. Y'all'll transfer the files, scout the progress and move on. But, if you have many different files that may take many minutes or even hours or have an automation routine, you can also transfer files in the background and employ the WinSCP queue.
Using background transfers, you can speed up file transfers by transferring in parallel or merely free upward your WinSCP console to do other things while files are transferring.
To transfer files in the background, invoke an advanced transfer every bit described in the previous department. In the Transfer Settings dialog box, you'll see an option labeled Transfer in the background (add to transfer queue).
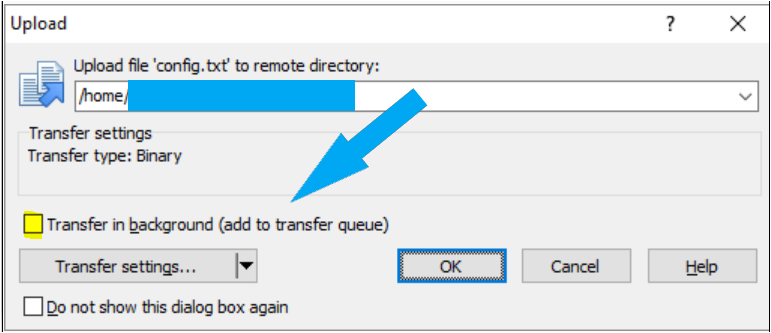
By selecting Transfer in groundwork choice when performing a transfer, WinSCP will immediately add together the transfer to the transfer queue, as shown below. The transfer queue is where WinSCP tracks all background transfers.
Once a transfer is in the transfer queue, you can perform other activities in WinSCP includes initiating some other transfer! The transfer queue is a slap-up mode to perform various transfers at once and to queue them all up instead of waiting for each transfer to complete.

For each background transfer, WinSCP opens a separate connection to the server using the same session options you defined when creating the session. These new connections are kept in the groundwork and reused for time to come transfers.
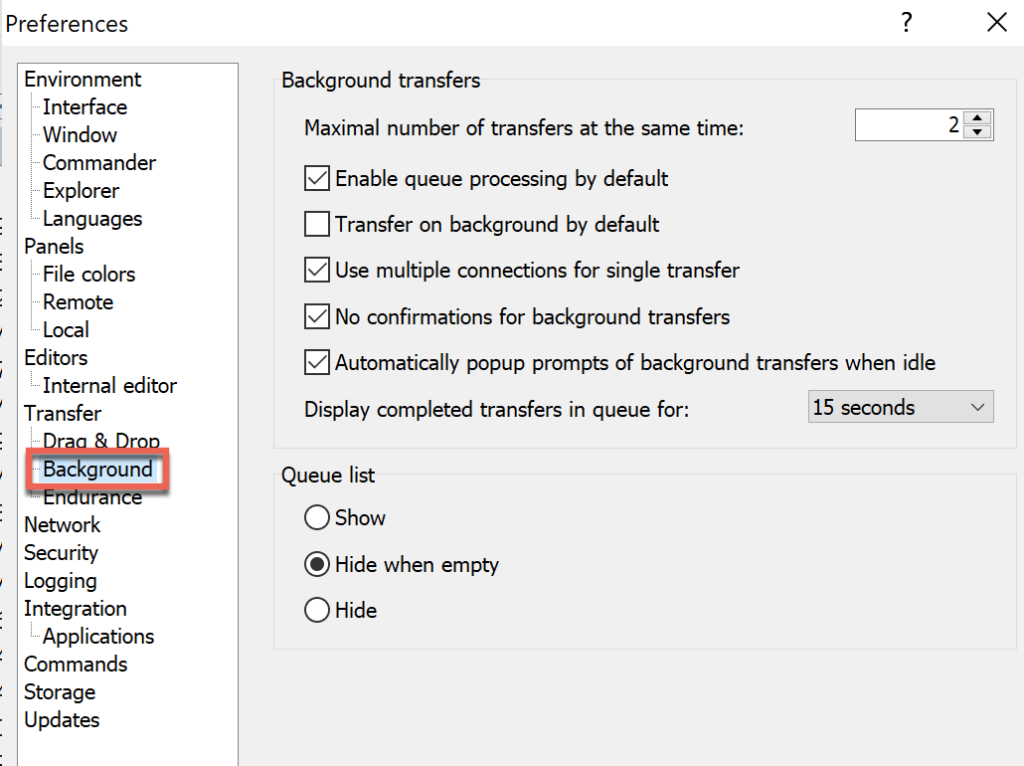
By default, the transfer queue will only endeavour to perform 2 transfers at in one case. You tin can change this behavior past opening the Preferences carte and changing the Maximal number of transfers at the same fourth dimension nether the Groundwork department, equally shown beneath.

In the Background transfers Preferences menu, y'all tin change the beliefs of the transfer queue.
Managing WinSCP Sites
Fifty-fifty though WinSCP lets you connect to remote hosts quickly, past default, it won't save those connections. Chances are, y'all've got many different hosts in your surroundings and information technology's going to get former remembering the hostname and credentials.
Let's say yous have a remote host with SSH enabled that you connect to frequently. Y'all'd like to relieve that connection so you can browse to that host and automatically connect. To create saved connections or what WinSCP refers to as sites, yous can save connections to remote hosts so that you tin simply browse to a site and connect.
Creating WinSCP Sites
To create a WinSCP site and save your session for later use:
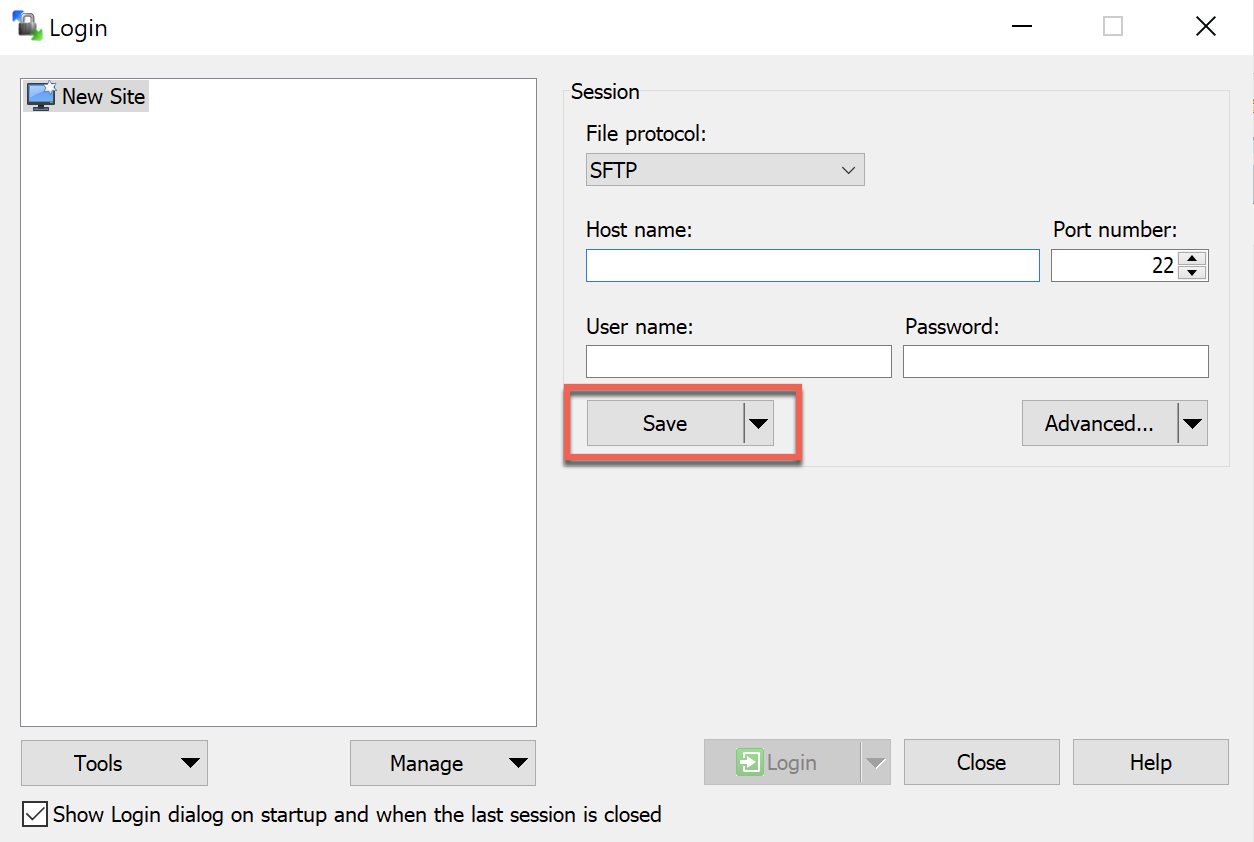
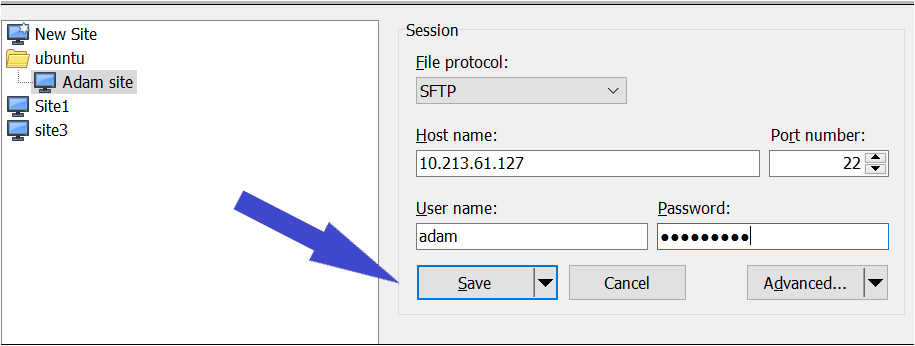
1. Click the Session carte as mentioned in the Connecting to a Remote Host section and provide all of the necessary connectedness data.
ii. Click on the Relieve button.
three. Next, provide a Site proper name for the saved connection and an optional binder and click OK to confirm.
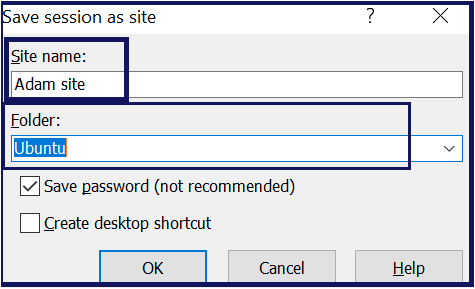
If you lot just take a scattering of connections you lot'd like to save, you don't need a folder but if you're using WinSCP to connect to dozens or even hundreds of different hosts, categorizing connections into folders is a great way to detect those connections subsequently.
Now, In the Login window, you lot'll see your new site. This time, instead of the session properties being available to edit, they're all greyed out. The properties are now saved in a site.
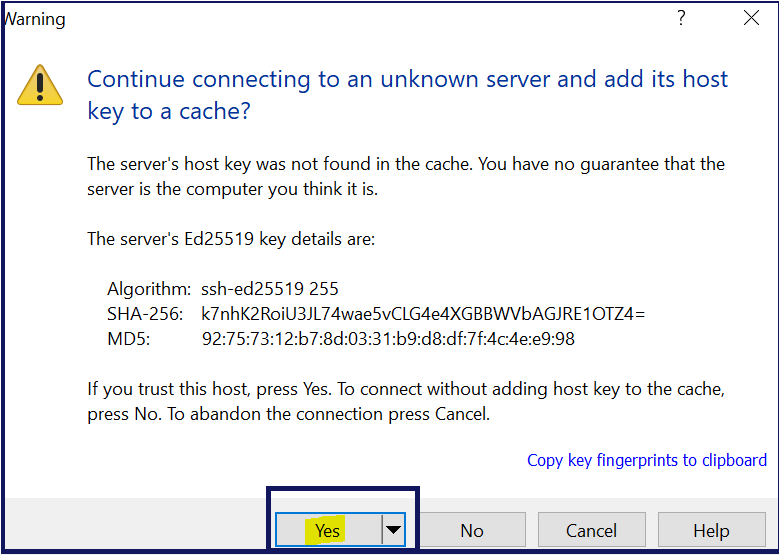
four. Finally, click on Login to examination the site'south connection. Later you click on Login, the connection to a new site begins.

5. Select Yes to add the server host keys to your arrangement enshroud and so that WinSCP can trust the remote host. If you lot trust the remote host's key details, click the Yes button.
You don't have to save the server host'south keys. If you click No, you'll however be able to connect to the remote host but you volition receive this prompt every time.
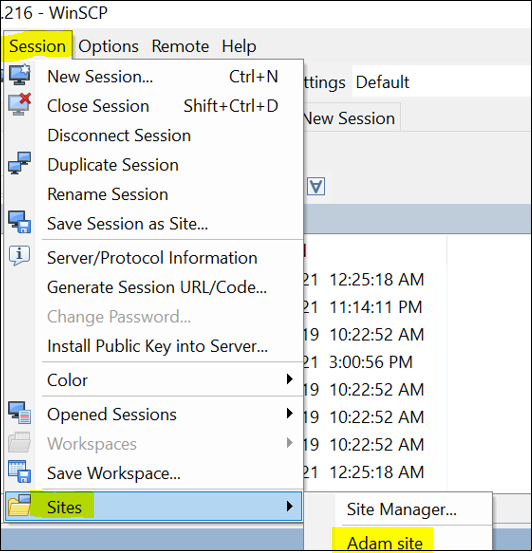
One time you've created at least one site, you now find them by clicking on the Session menu —> Sites and clicking on the site you'd like to connect to, equally shown beneath.
Editing, Renaming and Removing WinSCP Sites
In one case you have a site created, you tin and so change information technology however you'd similar. Peradventure you need to edit properties of an existing site like changing the hostname or username perhaps, you can do that too in WinSCP.
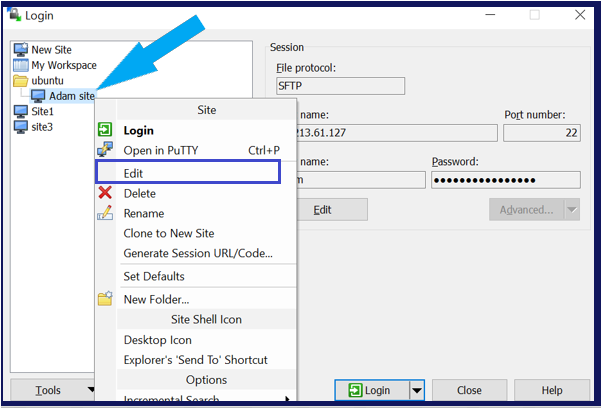
1. Click on the Session card item which will bring upwardly the Login window again. You will see all of the saved sites in the Login window.
You tin can alternatively bring up the Login window/Site Manager by clicking on the Session bill of fare —> Sites —> Site Manager.
two. Discover the site you'd like to edit, right-click on the site and click on Edit, equally shown below. The previously greyed-out options volition now be available to edit.
To rename or delete a site, click on the Delete or Rename carte detail. You can even create copies of sites that mayhap share the same username by clicking on Clone to New Site.
3. When you've edited whatever needed properties, click on the Salvage button, as shown beneath.
Y'all'll encounter an Avant-garde button in the Site Manager. WinSCP stores sites in files. If you need to modify settings of a site in the files themselves, hither you tin edit the raw settings and alter advanced settings you might non demand too often.
Backing Up and Restoring All Sites
Perhaps y'all've created dozens of sites and get a new computer. Now what? WinSCP doesn't take a cloud service it syncs to. You must manually transfer over those sites. To do that, WinSCP has a concept called configurations that let you to backup and restore all of your sites.
To consign all saved sites:
Open the Site Manager and click on the Tools push button. Click on Export/Backup Configuration which volition prompt you to save all of your sites in an INI file in your location of choice.
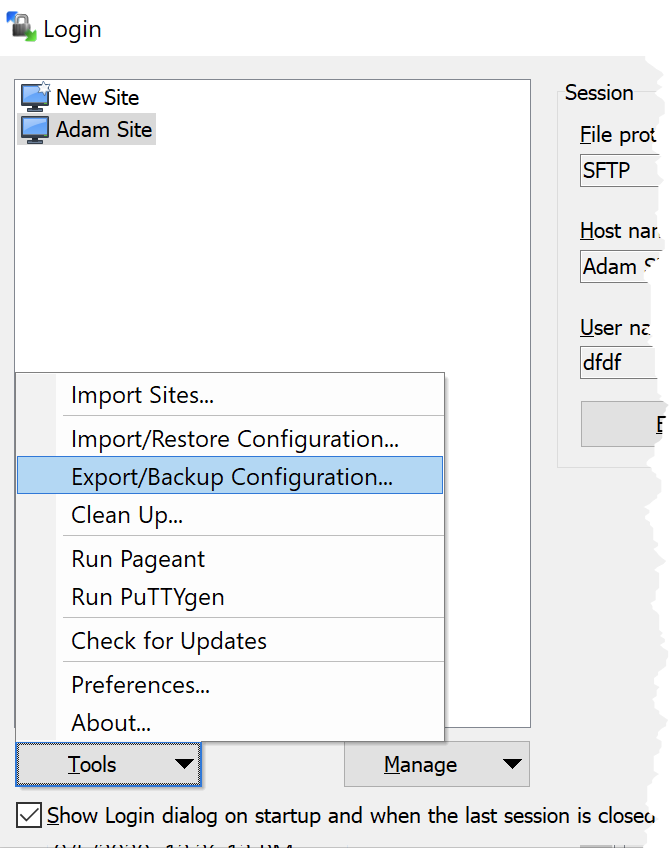
To import a saved configuration, click on Import/Restore Configuration. Importing a configuration volition overwrite all existing sessions!
Importing Sites from Other Tools
If you lot're using the popular Putty SSH customer and already have saved sessions in there, there'south no reason to reinvent the wheel. You can import all of those sessions directly into WinSCP.
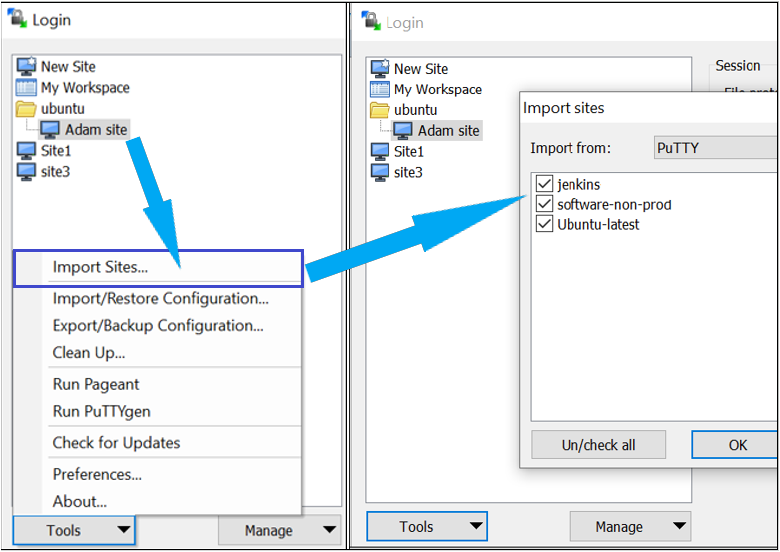
To do import sites from other tools similar Putty:
ane. Open the Session Director.
2. Right click anywhere in the left site carte and click on Import Sites. WinSCP will bring upwards the Import sites window showing you all of the supported sources to import sites from such as Putty, FileZilla, and known_hosts.

3. Select a source to import from. WinSCP should then provide you with each site it's capable of importing in the box below.
Select each session y'all'd like to import or click the Un/check all push and click on OK to import the sessions.
Session Logging
If you need to go back to a command issued in a remote session, you're going to need some mode to relieve the history. WinSCP provides a session logging feature that does just that. Open the Preferences menu particular and click on the Logging pick, yous'll meet a way to enable session logging.
Don't worry. Passwords are never recorded in any log unless you choose the Log passwords and other sensitive information checkbox.
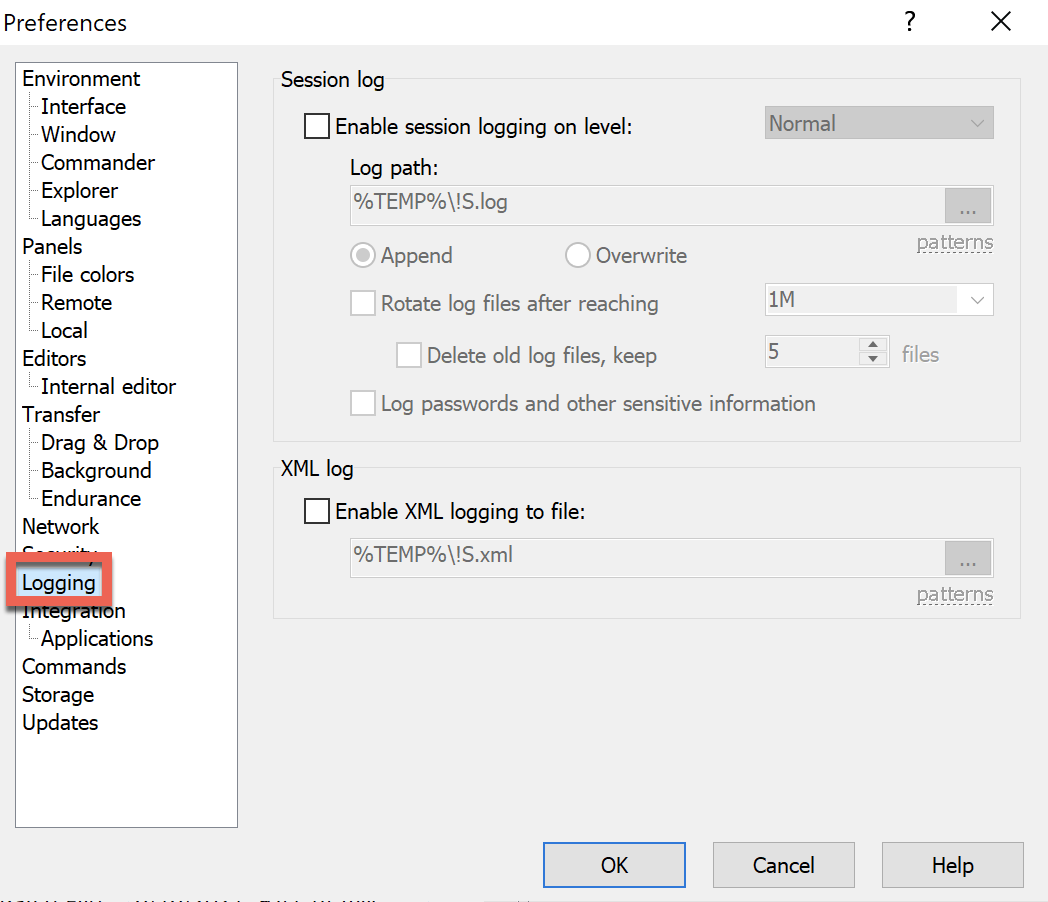
To enable session logging, check the Enable session logging on level checkbox and provide a logging level.
Session Logging Options
In the session log, WinSCP logs events in an instructured style that varies by the protocol the session is using. The session log is typically expert for troubleshooting purposes.
You have a few different levels of logging you can define for the session log.
- Reduced – The to the lowest degree granular logging level.
- Normal – This logging level is typically adept enough for most troubleshooting or auditing and is the default.
- Debug 1/Debug ii to get extremely granular.
The Log Path is where WinSCP will save the log file. Hither you can specify dynamic criteria to take WinSCP save the log files according to date/fourth dimension attributes and more than.
You can use a combination of patterns to create the desired log file name such as:
- Year –
!Y - Month –
!1000 - Day –
!D - Time –
!T - Hostname –
[electronic mail protected] - Session Proper noun –
!South - Process ID –
!P - Assertion Mark –
!!
Limit log sizes past defining the maximum size a log file can abound by enabling the Rotate log files after reaching checkbox. In this dropdown, y'all can use G,M, andG to represent bytes. If a log file grows also big, WinSCP volition create a copy with an extension.1,.ii, etc.
If you're already in a session and enable logging, logging will outset when you enable it. WinSCP volition not tape all previous session history in the log file.
The XML Log
Y'all'll configure what to record and how to tape information technology in the Session Log section. The session log records logs in an unstructured text file. But, if you need a more structured approach for time to come parsing, y'all should tick Enable XML logging to file.
By enabling XML logging, WinSCP will generate a structured XML file. This format includes less information than the session log but can be used for scripting purposes.
Managing Workspaces
Perhaps, y'all routinely work with a set of sites y'all have open all solar day. You typically demand to access these hosts in some style. Rather than opening upwardly each site every day, yous can save them all in a workspace to salve all connected sites as i.
Saving a Workspace
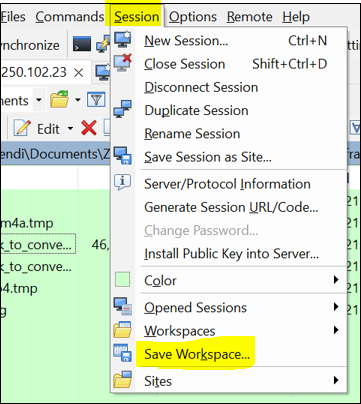
Perhaps yous have dozens of sites open up and want to immediately come dorsum to them at one fourth dimension. Yous need to create/save a workspace. To do that, click on the Session card and choose Salvage Workspace. WinSCP will so prompt you for a place to save the workspace file.
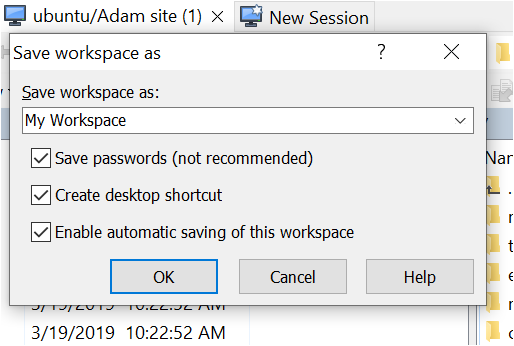
In the Save workspace equally dialog box, provide a proper name and select whatever or you not yous'd like to save whatever passwords.
Y'all'll also see a Create desktop shortcut option. If you select this option, WinSCP will create a desktop shortcut with the following target. This target will open a workspace called My Workspace. This desktop shortcut is handy because, without it, you'll have to open up the workspace with the Session Manager, every bit explained in the next section.
C:\Programme Files (x86)\WinSCP\WinSCP.exe "My%20Workspace" /Desktop You'll also encounter an Enable automatic saving of this workspace selection. This selection is handy because you won't' have to manually relieve your workspace as demonstrated to a higher place.
Opening/Restoring a Workspace
Once you have saved a workspace on your figurer somewhere, you need to open it somehow. To open/restore a workspace:
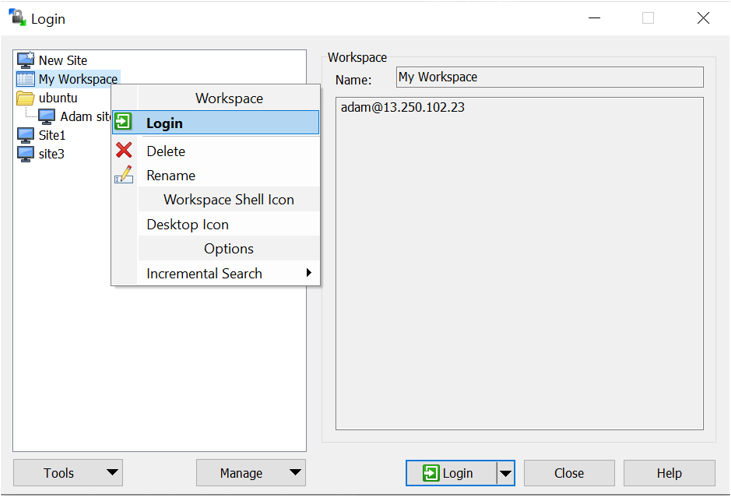
Open Site Manager, observe the workspace in the left pane, right-click on the workspace, and select Login.
The workspace saved when WinSCP was closed the last fourth dimension is automatically selected when the Login dialog opens
Running SSH Commands on Remote Hosts
Using features like the built-in command-line box, custom commands, and even Putty, y'all tin quickly run diverse short commands on a connected host.
The WinSCP Control Line
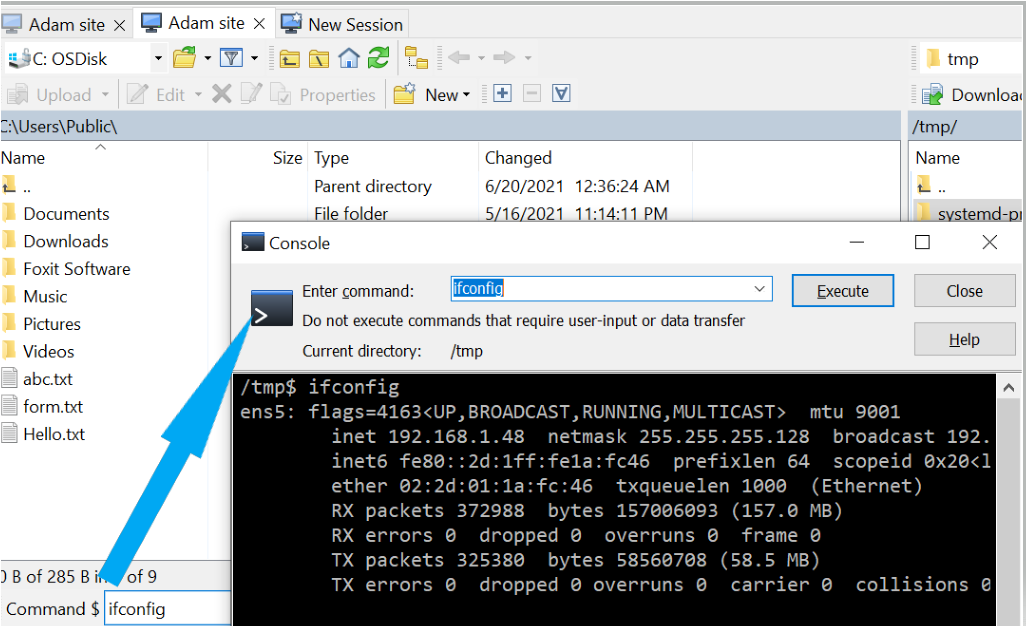
If you need to run a simple SSH command without having to open a split up SSH client, yous tin practise then past using the WinSCP control line feature. To access the feature, click on the Options menu and select Command Line, as shown below. Y'all'll run across a Command box appear at the bottom.
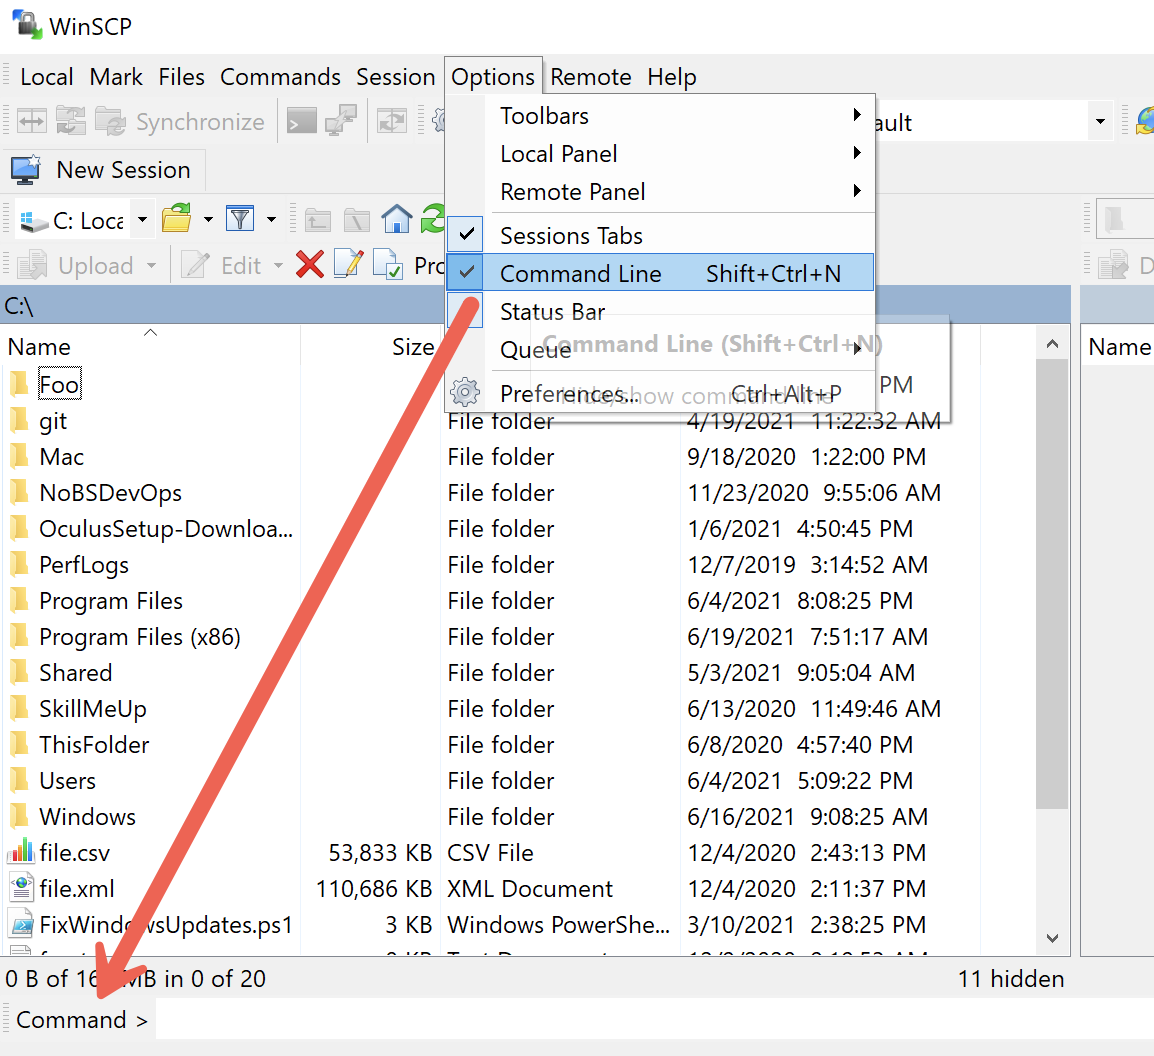
Once you have the Command box open up, type in any final command you wish and WinSCP will execute it on the remote host. For example, type ifconfig , as shown below, to detect IP address information on the remote host.
Do not run commands that require user input. The WinSCP control line doesn't support interactive commands.
Custom Commands
Let'due south say y'all find yourself running a particular command over and over on a remote host or peradventure you'd like to run a item command against all files in the remote file pane. If and so, WinSCP's custom commands feature is for yous.
Custom commands are pre-configured commands that can incorporate variables representing environmental attributes like the host you're continued to, the user you're connected with, and more. Custom commands templatize common deportment.
For case, running a custom command such every bit cat "!", runs the cat command on every selected file in the remote panel. Or, you tin can simply have a circuitous SSH command to salve and run later.
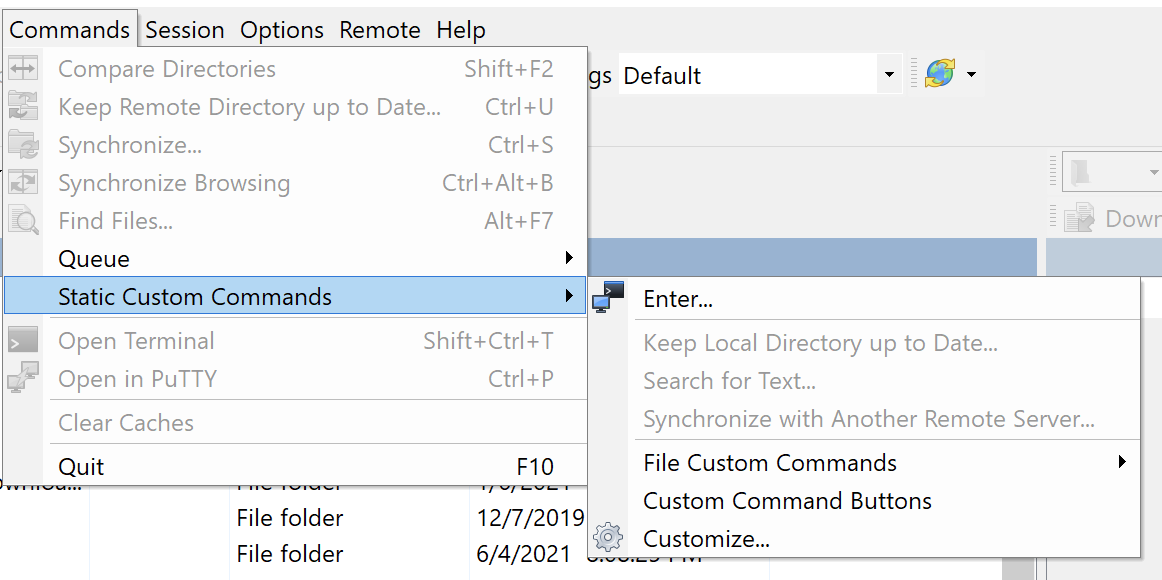
To ready and run custom commands, click on the Commands bill of fare then on Static Custom Commands. This menu is where you will see how to enter advertising-hoc custom commands or fifty-fifty save some of your own.
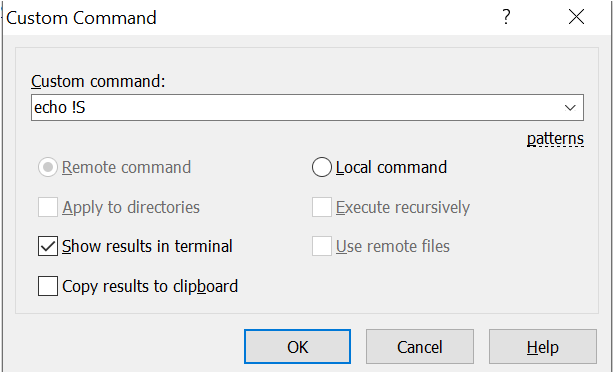
To demonstrate, click on Enter. The Custom Command window will announced.
In the Custom Command window, type echo !S to encounter how WinSCP translates the !S placeholder with the session URL and click OK.
You tin find all placeholders on the WinSCP Custom Commands documentation page.
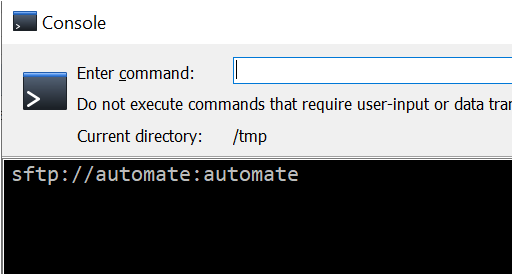
Detect that since the Bear witness results in terminal pick was selected, WinSCP brought upward the same Console window as used with the command line characteristic. Below you tin can see that !S was translated to sftp://automate:automate which is the session URL.
Using Putty
In one case yous've created a session in WinSCP, you don't have to use WinSCP to exercise further tasks. You can actually pass that session to the popular Putty SSH client.
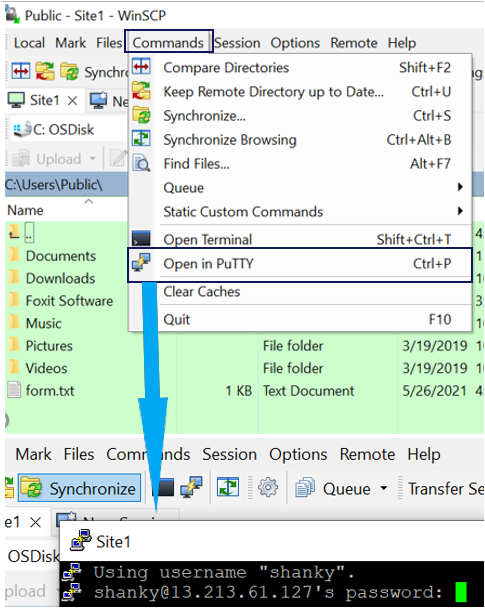
If y'all're currently in a WinSCP session, open up a WinSCP session in Putty by clicking on the Commands carte and click on Open in Putty. You'll see that Putty opens and connects to the remote host you're connected to in WinSCP.
By default, Putty will prompt for a password unless yous add access key id and underground key for the particular machine.
Cleaning Upward
WinSCP stores several types of information on your system on the file system and in the registry. If y'all're on a shared computer, for instance, you might want to clean all of this upwards. To do so:
1. Open up the Site Managing director.
ii. Click on the Tools button.
3. Click on Make clean Up. You lot'll then encounter a Cleanup awarding data box, as shown below.
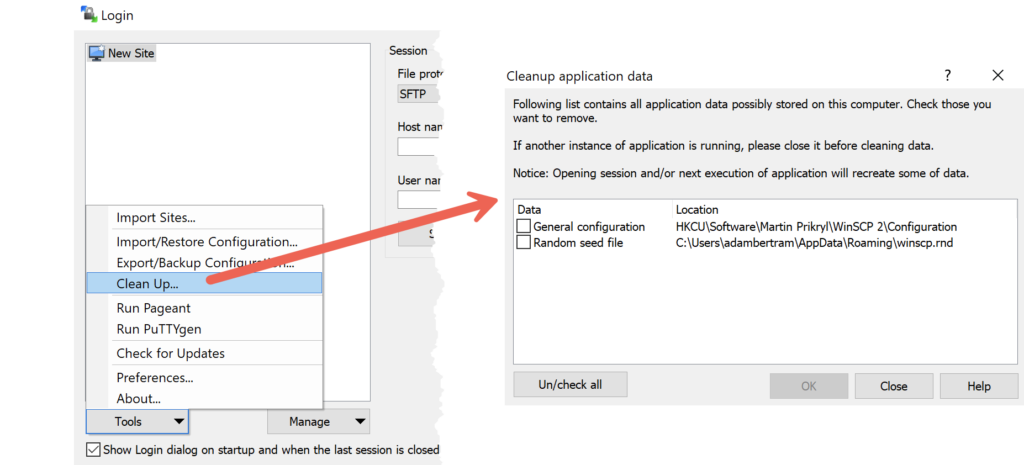
4. Select on each item (typically General configuration which is all workspace and site-related information stored in the registry) and Random seed file which contains randomly generated data on WinSCP startup to seed its encryption random number generator.
Keeping upward to Appointment and Getting Assistance
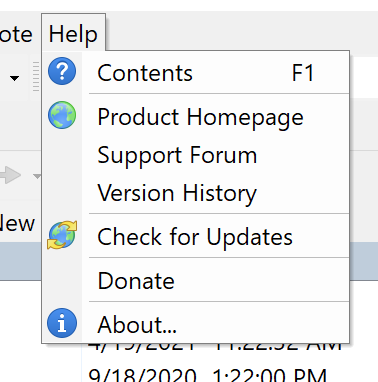
Finally, it's important to proceed WinSCP up to date for the latest problems fixes and features. If you think you're version is out of date, click on the Assistance menu and click Check for Updates. WinSCP will cheque for a new version and will prompt you to install a new version if ane exists.
The Aid menu is besides a great identify to find WinSCP documentation, a place to donate to the open-source project if y'all wish and more.
Conclusion
WinSCP is a handy, free tool to aid y'all transfer files and also run remote commands on computers. Through its congenital-in sites, diverse ways to select and transfer files, you lot can't beat it for the cost.
Now that you're a WinSCP guru, how do you plan to utilize information technology?
Source: https://adamtheautomator.com/the-winscp-gui-the-ultimate-guide/
0 Response to "Make Overwrite Prompt Appear Again in Winscp"
Postar um comentário